5: Add the Back End
Adding the BaseApiGatewayRestApi and BaseLambdaFunction
You should now have a pipeline in the devops account, your codebase in your bit bucket repo, and a hello world front end.
In this lesson, we will add a lambda and api-gateway backend, again using CDK constructs. We will now use an Assembly Line construct to create a webpage. By using this construct, you will add all the components you need for your application’s front end with only a few lines of code.
Edit the backend file
In your project directory open the file ./lib/‘yourprojectname’-backend-stack.ts
Replace all imports with the following:
import { join } from 'path';
import { ComparisonOperator } from 'aws-cdk-lib/aws-cloudwatch';
import { AttributeType } from 'aws-cdk-lib/aws-dynamodb';
import { Aspects, Duration, Stack, StackProps } from 'aws-cdk-lib';
import { Code, Runtime } from 'aws-cdk-lib/aws-lambda';
import { LambdaIntegration } from 'aws-cdk-lib/aws-apigateway';
import { Construct } from 'constructs';
import { CPEMonitoringAspect, MetricAlarm } from '@assembly-line-core/common';
import { DynamoDBTable } from '@assembly-line-base/dynamodb-table';
import { BaseLambdaFunction } from '@assembly-line-base/lambda-function';
import { ApiGatewayRestApi } from '@assembly-line-base/apigateway-restapi';
Insert the following lines after this line:

!Remember to replace YOURPROJECTNAME with your project name
    const api = new ApiGatewayRestApi(this, 'YOURPROJECTNAME-API', {
      appConfig: {
        appName: 'YOURPROJECTNAME',
        envName: 'dev'
      }
    });

    const ping = api.restApi.root.addResource('ping');
    ping.addCorsPreflight({
      allowOrigins: ['*'],
      allowMethods: ['POST']
    });
    const pingFn = new BaseLambdaFunction(this, 'YOURPROJECTNAME-API-Ping', {
      appConfig: {
        appName: 'YOURPROJECTNAME',
        envName: 'dev'
      },
      handler: 'index.handler',
      runtime: Runtime.NODEJS_18_X,
      code: Code.fromAsset(join(__dirname, '../../applications/lambda')),
      timeout: Duration.minutes(1),
      memorySize: 128
    });
    ping.addMethod('POST', new LambdaIntegration(pingFn.lambdaFunction));
Save the file.
Create the lambda directory inside the applications directory and add the code
At line 21 in step 1, you will see code: Code.fromAsset(join(__dirname, ‘../applications/lambda’)), which is where your lambda code will be placed now.
At root of your project, you will find a directory called lesson-code. Inside, you will find lesson5 directory containing lambda code typescript sub-project.
This code will need to be copied over to applications/lambda Execute the following from the root of your project:
Please create lambda folder under the applications
cp lesson-code/lesson5/* applications/lambda/
cp lesson-code/lesson5/.* applications/lambda/
Amend application manifest to build the lambda
By default, the GLF Pipeline will perform the following three operations during the codebuild build phase:
npm run buildnpm run testnpx cdk synth
The applications/lambda directory is a Typescript project of its own and needs to be built in order for your CDK project to be able to deploy it. We need to configure our GLF Pipeline to build this sub-project.
A File called “build.yml” in “cdk/” (code cdk/build.yml) has been created by the template already.
You should be able to see the following:
phases:
  install:
    runtime-versions:
      nodejs: 22
Add the following to the file and save it ( make sure “pre_build” is inline with install phase to avoid indentation errors ):
  pre_build:
    commands:
      - cd applications/lambda
      - npm run build
      - cd '../..'
A reference to the build.yml file has been added to the GLF pipeline config.
  ProjectName: AssemblyLineTestApp # Name for the project to identify
  RepositoryUrl: team-shared-sandbox/lk-test-app # URL of the bitbucket repository
  Privileged: true

  Pipelines:
    - PipelineName: AssemblyLineApp-main
      Environment: dev
      SourceBranch: main
      DeployRegion: ap-southeast-2
      DeployAccount: 702209111549
      Testing:
        Enabled: False
        PostE2E:
          Repository: team-shared-sandbox/AssemblyLineApp-main
          Enabled: False
      BuildSpec:
        Path: 'cdk/build.yml'
Add lambda sub-project to the CDK application npm workspace
npm workspaces is a great feature that can help us manage the deployment of our new lambda sub-project
Edit root level package.json and add the following entry:
  // rest of package.json content
  "workspaces": [
    "applications/lambda"
  ]
Install lambda’s dependencies:
# can be invoked from the root level of the cdk app
# now that the lambda is defined as workspace in package.json
npm install
Rebuild the project with new code
Lets try build our project using npm run build (we might not be able to do so yet)
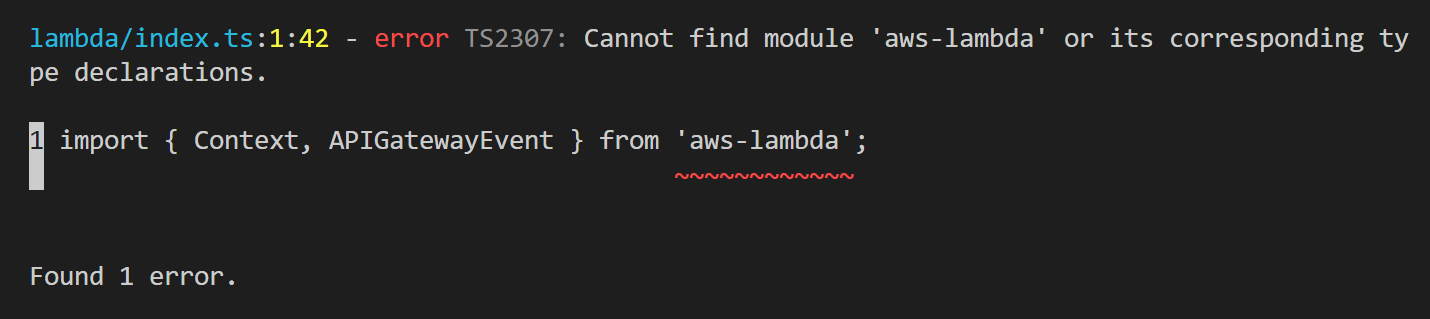
Fix dependency issues
To fix this error, you need to add aws-lambda to your package.json so CDK knows to use the lambda package. edit package.json in the root of your project directory.
Locate the “dependencies” section, and add aws-lambda. It can go anywhere you like in this section, but make sure the preceding line has a comma, and if there are more lines after your inserted line, ensure it ends with a comma:
  "dependencies": {
    //...
    "@assembly-line/assembly-line": "^3.3.1",
    "@assembly-line-base/apigateway-restapi": "2.0.0",

    "aws-lambda": "^1.0.7"
  }
Also locate the “devDependencies” section and add @types/aws-lambda. Again, make sure the preceding line has a comma, and that your new line has a comma if there are more lines in the section afterwards.
  "devDependencies": {
    "@aws-cdk/assert": "2.36.0",
    "@types/aws-lambda": "^8.10.101",
  }
Install dependencies
Run npm install to install the newly added libraries in previous step.
Run npm run build to rebuild your project. The error we encountered earlier should now be resolved.
Run npx cdk synth to create Cloudformation templates based on your CDK code and confirm that they can be created successfully.
Commit the code to your repo
Since we have made changes to the GLF Pipeline config, we need to call npx cdk deploy –all once again. Simply pushing changed to the repository is not enough in this case.
Afterwards, to allow the GLF pipeline to build, test, deploy and release your project, these changes need to be published to the remote repository.
git add -A
git commit -m "feat: adding backend"
git push
Monitor your build pipeline
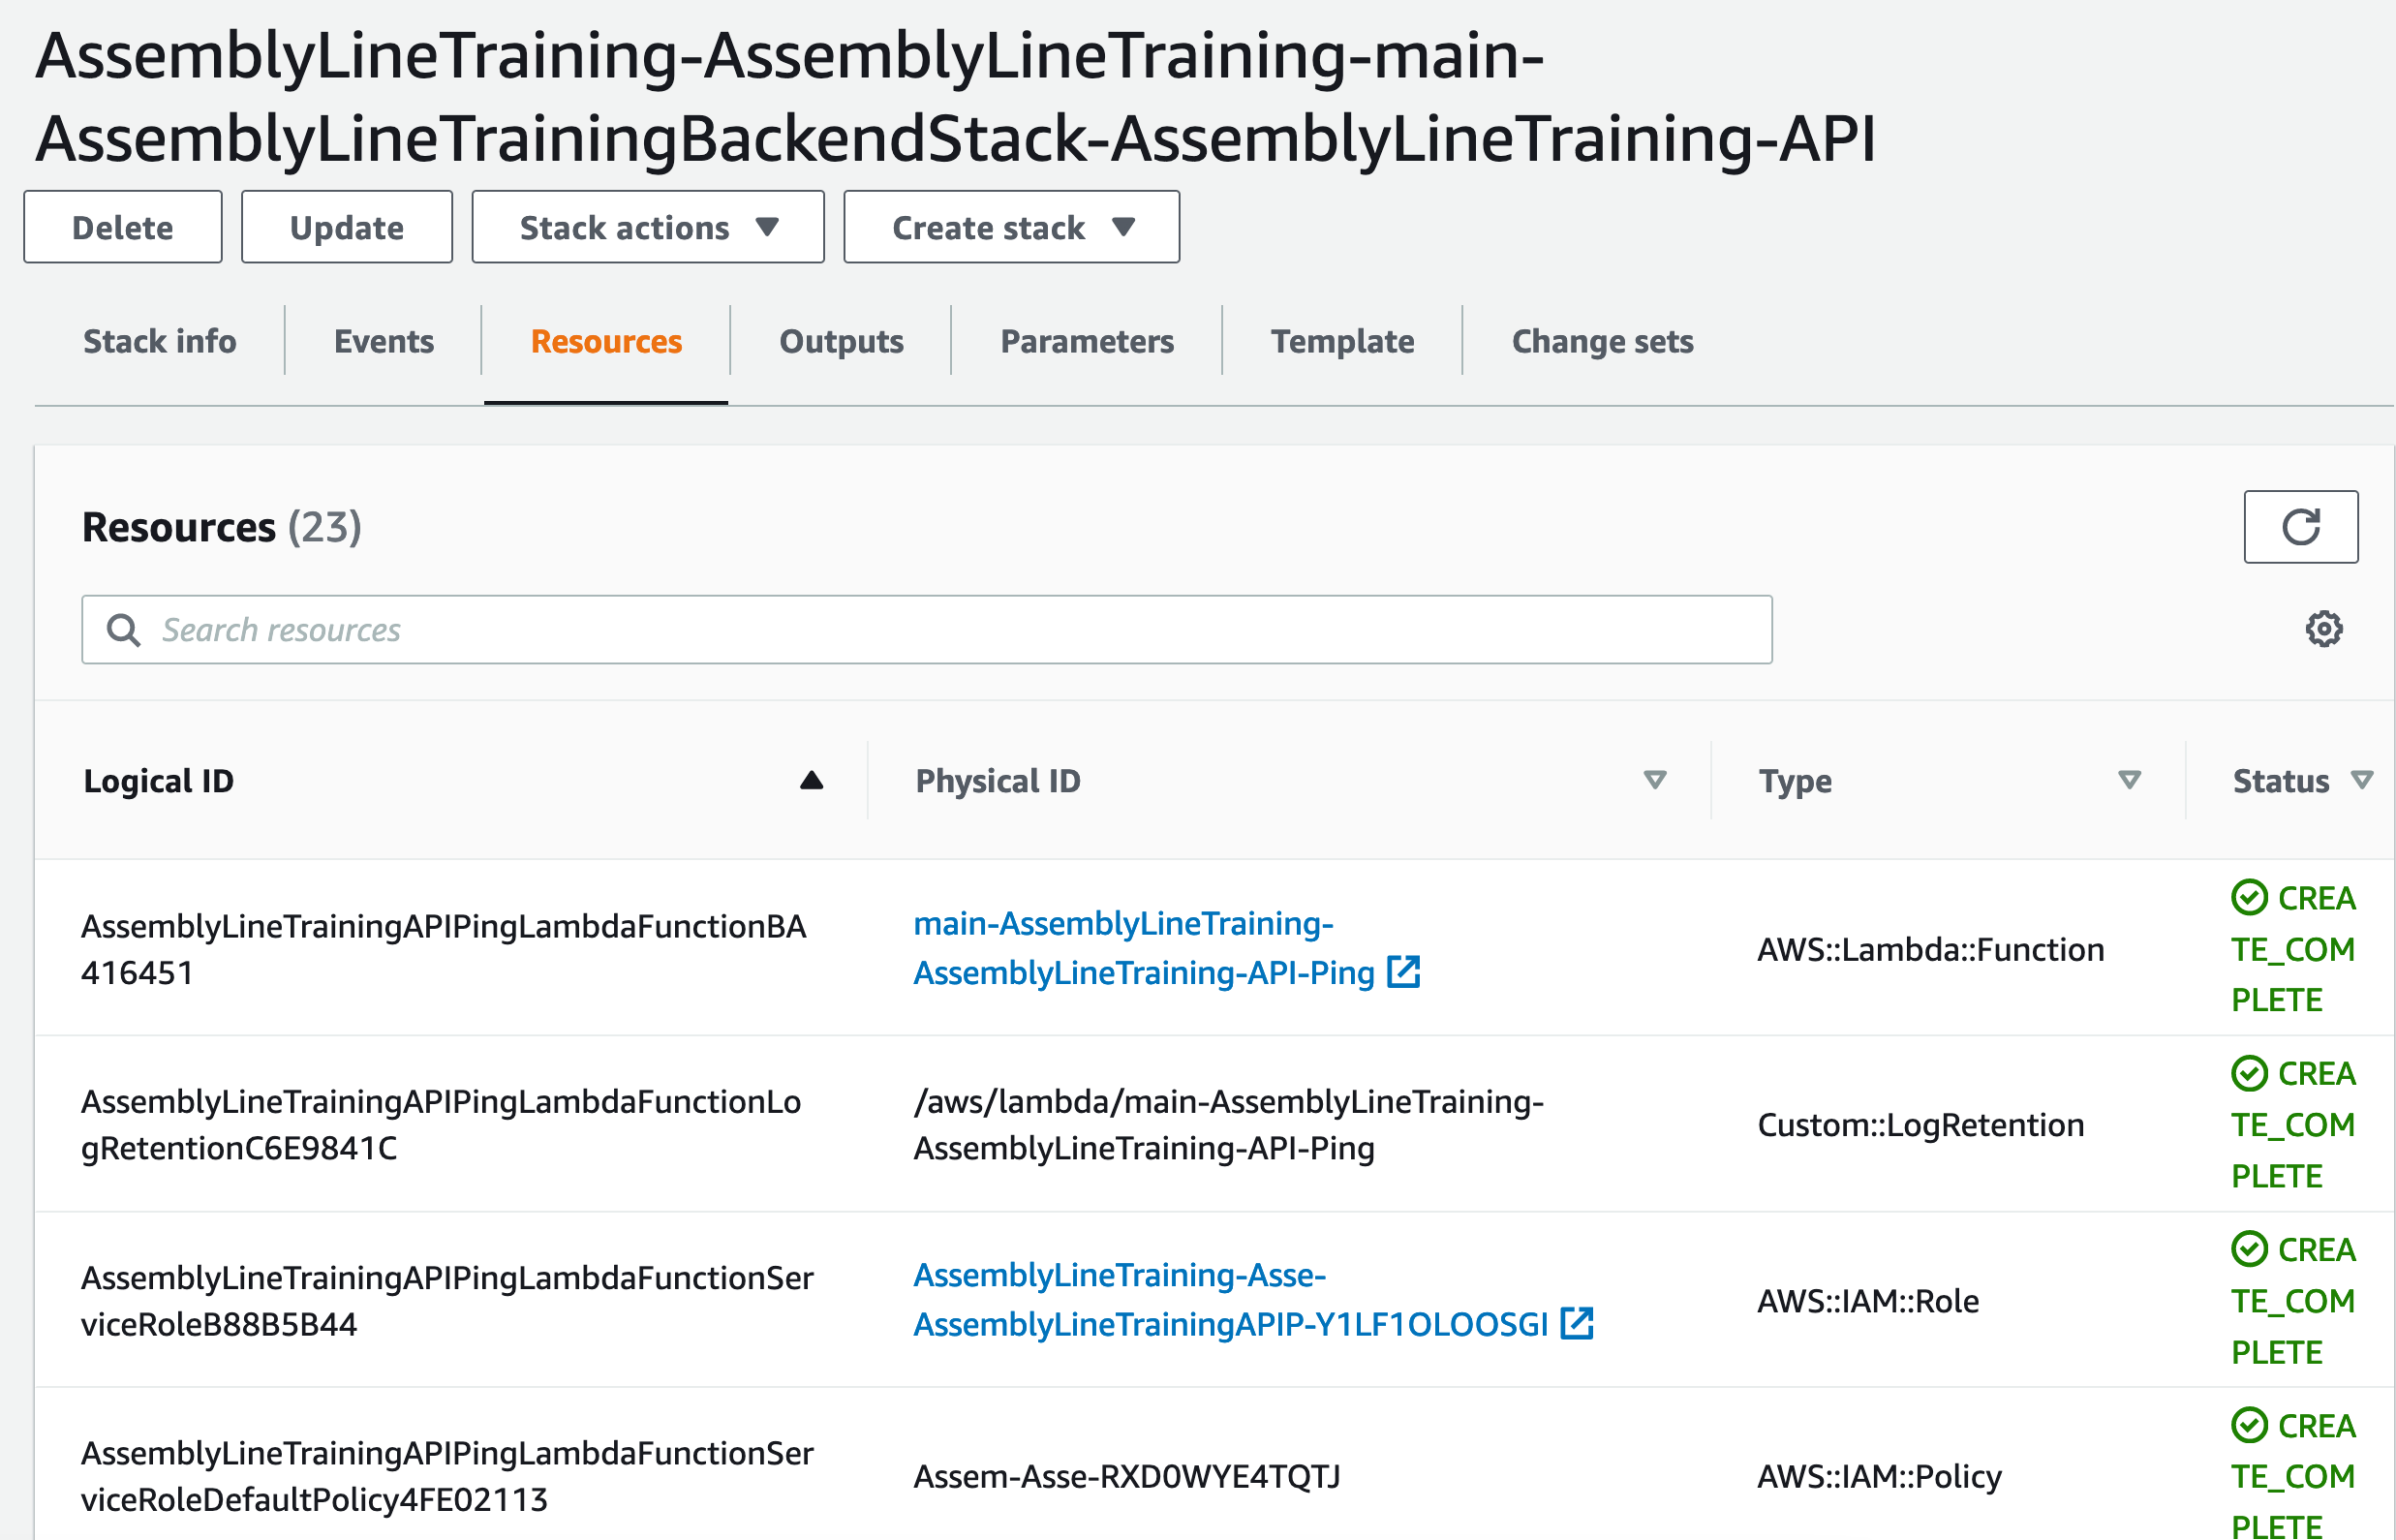
Find the endpoint of your API
In the workload account (your team-shared-sandbox-dev), locate your backend stack. Look at all the resources your stack now has. It may look something like this:
Look at the outputs tab
Click on the outputs tab. You will observe that your stack has an output value with your API’s endpoint. This is also exported as “myAPI”. You will be able to query this value in the next lesson to connect your back and front end and make them work together.
Test your api endpoint
You can use the following curl command to test your backend API. Replace API endpoint with your API endpoint:
curl -X POST https://29hb598uv7.execute-api.ap-southeast-2.amazonaws.com/dev/ping -H ‘Content-Type: application/json’ -d ‘{“name”: “Your-name”}’
Help & Troubleshooting
Problem
Errors/warnings appear during cdk synth step that are related to security.
Solution
This is due to a component called CDK Nag. It checks your project for best development practices and it is generally a good idea to enable it. Generally, it is a good practice to understand the cause of these errors and configure the construts to resolve them.
For now, disable it in order to reduce training complexity. Open cdk/glf-config.yaml using your preferred code editor and locate the following item:
 Change the Nag: value to False and save the file.
Run npx cdk synth from the root of your project to rebuild it.